Closing Down
Unfortunately, we're in the process of closing down Crafting4Good CIC after almost
9 years of social enterprise and impact.
Creativity is good for you, but running a busy creative nonprofit on increasingly limited resources is not. As a result the team were stretched, stressed and experiencing the very opposite of "creativity for wellbeing and mental health".
This website *may* stay online under a different name to preserve the legacy and resources created through years of funding with public money.
Card Making Tutorial:
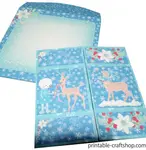
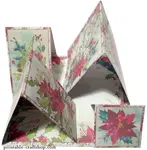
Acetate Box Lid for Easel Cards
An alternative card making tutorial for putting together our 'Easel Card with Drawer' range, using acetate on the box lid so that you can see the card inside. Because the only difference is the acetate box lid, we have not duplicated all the instructions and photos - follow the original Easel Card Making Tutorial to see how the card, box and sleeve is made.
Our Easel card kits are available in a big value bundle or as single kits - the kit here is the "Christmas Friends" kit, but we also have a video tutorial for "Santa's Visit" and a quick video demo for the "Hootie Holiday" printables over on the regular Easel Card Making Tutorial page.

Craft Supplies Needed
- Christmas Friends Easel Card with Drawers Kit (also available in a value Bundle of 10)
- Glue, tape, 3D foam pads for sticking
- Score board, ruler, pencil
- Scissors, trimmer, craft knife and cutting mat
- Brad for drawer
- Acetate (♻️ Try recycle plastic packaging!)
- Print on card stock for all sheets (250 gsm was used here but refer to your own printer capabilities)
Time to Make (after printing sheets needed): Average 20 minutes
Instructions
The first steps up to making the card and drawers are the same as for the Christmas Bells tutorial so we have not included all the steps and photos on this one: for the full tutorial please follow the linked original ⤴️
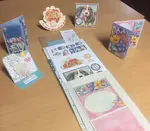
1. Print out the sheets in your kit ( ♻️ printing the backing paper onto the reverse of sheets with lots of white space, means you can then use the 'waste' for other projects). Cut and scored where indicated.

2. Cut out the decoupage elements for the topper and layer up using 3D foam pads or gel glue, ready to stick to the front of the card.
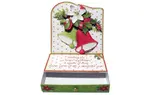
3. Stick the back panel to the reverse of the card as shown. Turn over and stick the topper to the front quarter of the card, and the stopper to the bottom quarter of the card – using 3D foam pads on the back to raise the stopper. Add the decoupage.
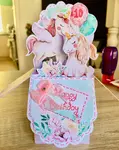
 Easel card finished *without* the optional drawer - it can be sent like this if you run out of time!
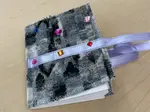
4. Cut out your box lid and score the folds, but prior to sticking the corners, cut out the white centre panel and stick your acetate / clear recycled plastic packaging inside to make a window box. Fold the corners in, glue and hold together until set - I find mini wooden craft pegs really helpful here! Make the base and top of the box. I have also added a spare sentiment to the bottom centre of the box.
 Cut out the white panel
 Easel card box adapted to have a clear acetate lid
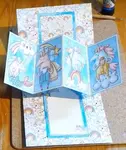
5. Make the drawer and sleeve, then slides into the sleeve.
Glitter
At Crafting4Good we try to avoid loose glitter, or at least mix any loose glitter donations with clear glue, since it's made of micro-plastic and is potentially harmful to the environment, like micro-beads We feel the same about plastic craft gems etc too and we realise our eco-outlook isn't shared by all, but being aware and making small changes adds up and we'll explain more in another page in time!
6. Glue the base of the card to the top of the draw. The card then folds down flat and will sit beautifully in the box you have made for it. Decorate with glitter glue* etc if you wish
Our Volunteer Crafter, Debbie has been kind enough to contribute this tutorial for you.

Instant Download to go with this
Card Making Tutorial
ℹ️ Sell What You Make - you may Sell What You Make for charity, fundraising and personal profit in your small, home-based craft business
Christmas Friends Easel Card with Drawer Printable Kit

Visit our Not-for-Profit Craft Shop
You Might Also Like:
Card Making Tutorial - Never-Ending Card
Never-ending card making tutorial using downloadable "printables with purpose"
Free Craft Supplies
We give free craft supplies to individuals and community groups in the Wakefield (UK) area primarily, subject to surplus
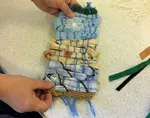
Weaving The Unremembered
Weaving used to remember The Unremembered from our World War 1 project with Big Ideas
Card Making Tutorial - Pop Up Box
Easy card making tutorial for making Pop Up Box Cards from printables with purpose
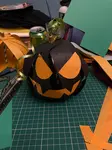
DIY Paper Pumpkins: Easy Craft Tutorial for Festive Decor
Learn to create charming paper pumpkins with our step-by-step guide, perfect for autumn decorations
Card Making Tutorial - 4 Fold Flap Easel Card
Card making tutorial for making a 4 Fold Flap Easel Card from our printables with purpose.
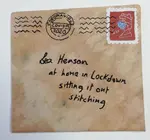
Slow Stitching - Letters from Lockdown
Slow stitching, or mindful stitching is a way of using creativity for positive wellbeing
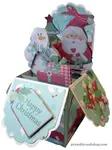
Christmas Easel Card Making Tutorial
Card making tutorial for one of our Christmas Easel Cards with optional Gift Drawer - printables with a purpose that help society profit!
Charity-Backed Activities for the Elderly with Crafty Printables
Liven up the weekly routine of seniors with creative, reusable card-making printables. Catering to a mix of capabilities, it’s an affordable and fun solution!

Recent Articles
-
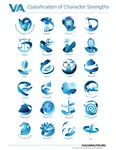
The 24 Strengths of a Person - Discover Yours!
Feb 28, 25 01:32 PM
 The 24 strengths of a person, measured scientifically in psychology, are their 'superpowers' that get them through life
 -
Art & Craft Ideas: Activity Library
Feb 27, 25 04:03 PM
 Art and craft ideas: self care activities for groups, adults, elderly, kids
 -
DIY Paper Pumpkins: Easy Craft Tutorial for Festive Decor
Feb 27, 25 10:58 AM
 Learn to create charming paper pumpkins with our step-by-step guide, perfect for autumn decorations


Crafting4Good CIC is a not-for-profit Community Interest Company, also trading as Crafting for Good, limited by guarantee and registered in England and Wales Company No.10690435.
Registered office: Suite 4, Unity House, Westgate, Wakefield, WF1 1EP